Welcome to the future of mobile connectivity! eSIM technology makes staying connected while traveling or managing multiple lines easier than ever. If you’re a Samsung Galaxy user and have a Yoho Mobile eSIM, you’re in the right place. This guide provides clear, step-by-step instructions to help you activate eSIM Samsung style – quickly and efficiently.
Whether you prefer scanning a QR code or manual activation, we’ll walk you through the Yoho Mobile Samsung setup process, ensuring you can enjoy seamless data access wherever your adventures take you. Let’s get your Galaxy phone connected!
Before You Begin: Prerequisites for Samsung eSIM Activation
Before diving into the activation steps, let’s ensure your Samsung Galaxy device and Yoho Mobile plan are ready. Preparing these items beforehand will make the Galaxy phone eSIM activation process much smoother.
- Device Compatibility: First, confirm your Samsung Galaxy model supports eSIM functionality. Most recent flagship models (like the S20 series, Note20 series, Z Flip/Fold series, and newer) are compatible, but it’s always best to double-check. You can view a list of compatible devices here: Check Yoho Mobile eSIM Compatible Devices.
- Unlocked Phone: Your Samsung Galaxy phone must be carrier-unlocked to use an eSIM from a different provider like Yoho Mobile. If you purchased your phone through a specific carrier, contact them to ensure it’s unlocked.
- Stable Wi-Fi Connection: You’ll need a stable internet connection (preferably Wi-Fi) on your Samsung device during the eSIM activation process to download the eSIM profile.
- Yoho Mobile eSIM Details: Have your Yoho Mobile eSIM activation details ready. These are typically provided via email after purchase and will include either a QR code or manual activation details (SM-DP+ Address and Activation Code).
Once you’ve confirmed these prerequisites, you’re ready to proceed with activating your Yoho Mobile eSIM.
Activation Method 1: Using a QR Code on Your Samsung
Activating your Yoho Mobile eSIM using a QR code is often the quickest and easiest method for eSIM setup Android on Samsung devices. Follow these simple steps:
Locating Your QR Code
After purchasing your Yoho Mobile eSIM plan, check your email for the confirmation message. This email will contain your unique QR code. Keep this email accessible, either on another device’s screen or as a printout.
Scanning the QR Code on Your Samsung Galaxy
- Ensure your Samsung phone is connected to Wi-Fi.
- Go to Settings on your phone.
- Tap on Connections.
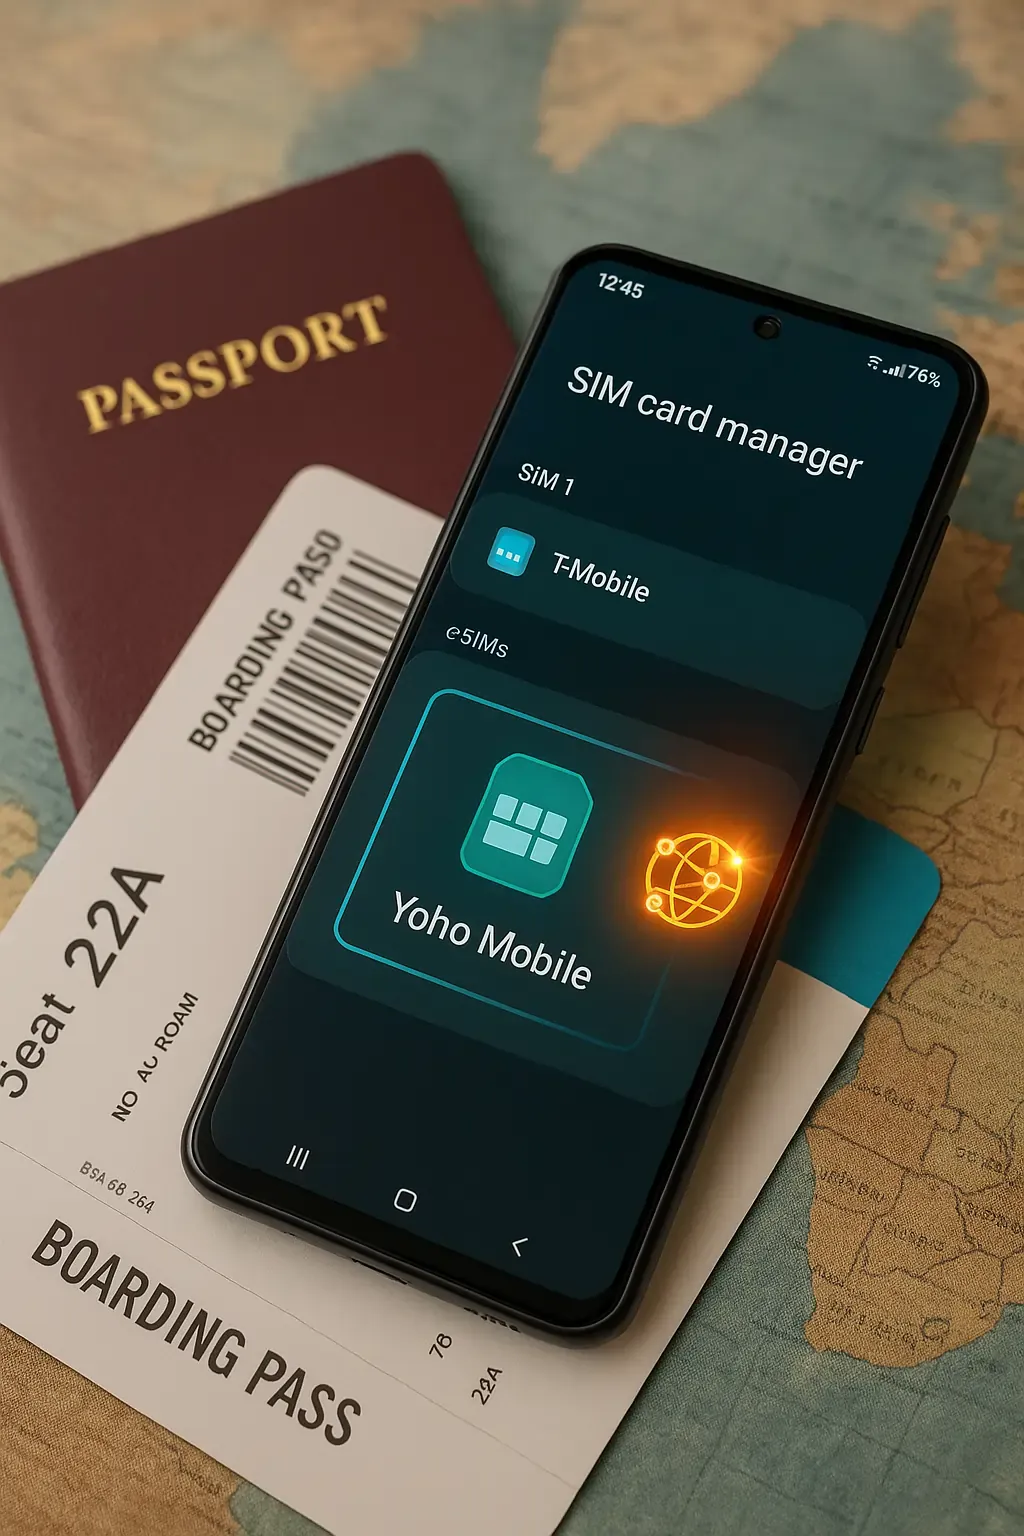
- Select SIM card manager.
- Under the ‘eSIMs’ section, tap Add eSIM.
- Your phone will search for plans. Ignore this and tap Scan QR code from service provider at the bottom.
- Position the QR code from your Yoho Mobile email within the camera frame on your phone’s screen.

Completing the Setup
- Once the QR code is scanned successfully, your phone will recognize the Yoho Mobile plan.
- Tap Add to download and install the eSIM profile. This might take a few moments.
- Follow any remaining on-screen prompts to finalize the activation.
You’ve now successfully added your Yoho Mobile eSIM using the QR code method! Proceed to the configuration section to customize its settings.
Activation Method 2: Manual Activation on Your Samsung
If you cannot use the QR code (e.g., camera issues, code not scanning) or prefer manual entry, you can still activate your Yoho Mobile eSIM using the details provided. This method involves manually inputting the activation information for your Galaxy phone eSIM activation.
Finding Manual Activation Details
Check the same email from Yoho Mobile that contained the QR code. Below the QR code, you should find the manual activation details, which typically include:
- SM-DP+ Address
- Activation Code
- (Sometimes a Confirmation Code, though often not needed for initial activation)
Keep these details readily available.
Entering Details Manually on Samsung
- Ensure your phone is connected to Wi-Fi.
- Navigate to Settings > Connections > SIM card manager > Add eSIM (just like in Method 1).
- Instead of scanning, look for an option like Enter activation code or Enter details manually. Tap on it.
- Carefully type in the SM-DP+ Address and the Activation Code provided in your Yoho Mobile email into the respective fields on your Samsung screen.

Completing the Setup
- After entering the details, tap Connect or Next.
- Your phone will verify the information and download the Yoho Mobile eSIM profile.
- Tap Add when prompted to add the plan.
- Follow any final on-screen instructions.
Your Yoho Mobile eSIM is now activated via manual entry. Let’s move on to configuring it.
Configuring Your Yoho Mobile eSIM on Samsung
Once your Yoho Mobile eSIM is added, whether by QR code or manual entry, it’s wise to configure its settings for optimal use alongside your primary SIM (if you have one). This ensures your Samsung Galaxy uses the correct SIM for calls, texts, and importantly, mobile data.
- Access SIM Manager: Go back to Settings > Connections > SIM card manager.
- Label Your eSIM: You should now see your newly added eSIM listed (it might have a generic name initially). Tap on the eSIM.
- Select Name (or similar option) and give it a recognizable label, like “Yoho Travel” or “Yoho Data”. This helps distinguish it from your physical SIM.
- You can also choose an icon if desired.
- Set Preferred SIMs: Back in the main SIM card manager screen, you’ll find options under ‘Preferred SIM cards’:
- Calls: Choose which SIM to use for outgoing calls by default. You can often select ‘Ask always’.
- Messages: Select the default SIM for sending SMS/MMS.
- Mobile data: This is crucial. Select your Yoho Mobile eSIM as the preferred SIM for mobile data usage, especially when traveling.
- Enable Data Roaming (If Required): For your Yoho Mobile eSIM to work internationally, data roaming usually needs to be enabled for the eSIM profile itself. Go to Settings > Connections > Mobile networks > Data roaming and ensure it’s toggled ON. Yoho Mobile plans are designed for roaming, so this won’t incur unexpected charges from us (standard data usage applies as per your plan).

Your Yoho Mobile eSIM is now configured and ready for use on your Samsung Galaxy!
Tips for a Smooth Yoho Mobile Samsung Setup
While the Yoho Mobile Samsung setup is generally straightforward, a few tips can help prevent common issues:
- Stable Connection is Key: Ensure you maintain a stable Wi-Fi connection throughout the entire download and activation process. Interruptions can cause the setup to fail.
- Follow Instructions Carefully: Double-check that you’re entering manual activation codes exactly as provided. They are case-sensitive.
- Allow Time: Downloading the eSIM profile can take a few minutes. Be patient and don’t navigate away from the screen unless prompted.
- Restart if Needed: If activation seems stuck, sometimes a simple restart of your Samsung Galaxy phone after adding the eSIM can help establish the network connection.
- Check Network Settings: After activation, if you have no data, ensure Mobile Data is turned ON for the Yoho eSIM and Data Roaming is enabled (as described in the configuration step).
- Troubleshooting: If you encounter problems like ‘eSIM not working’, refer to common solutions. You might find our Yoho Troubleshooting Guide helpful.
- Contact Support: If issues persist, don’t hesitate to reach out to Yoho Mobile customer support for assistance. Contact Us.
Following these tips will help ensure your activate eSIM Samsung experience is hassle-free.
Frequently Asked Questions (FAQ)
Here are answers to common questions about activating Yoho Mobile eSIMs on Samsung Galaxy devices:
Q1: Can I activate Yoho Mobile eSIM on any Samsung phone?
Not all Samsung phones support eSIM. Generally, flagship models from the Galaxy S20 series, Note20 series, Z Flip/Fold series onwards are compatible. It’s crucial to verify your specific model’s compatibility. Check Samsung’s official specifications or our eSIM-Compatible Devices list before purchasing a Yoho Mobile plan.
Q2: What if the QR code doesn’t scan during the Samsung setup?
If the QR code isn’t scanning, first ensure your phone’s camera lens is clean and there’s good lighting. Try holding the phone steadier or adjusting the distance. If it still fails, use the Manual Activation method described earlier in this guide, using the SM-DP+ Address and Activation Code provided in your Yoho Mobile confirmation email.
Q3: How long does eSIM activation take on a Samsung Galaxy?
The process of scanning/entering details and downloading the eSIM profile usually takes only a few minutes (2-5 minutes typically), provided you have a stable Wi-Fi connection. Connecting to the Yoho Mobile network for the first time might take another moment or two after activation is complete.
Q4: Can I use my physical SIM alongside the Yoho eSIM on my Samsung?
Yes! Most eSIM-compatible Samsung Galaxy phones support Dual SIM functionality (often Dual SIM Dual Standby - DSDS). This means you can have both your physical SIM and your Yoho Mobile eSIM active simultaneously. You can configure which SIM to use for calls, texts, and mobile data through the SIM card manager settings, making it perfect for travel or managing separate lines.
Conclusion
Activating your Yoho Mobile eSIM on your Samsung Galaxy device is a straightforward process that unlocks the convenience and flexibility of modern mobile connectivity. Whether you choose the simple QR code scan or the manual activation method, following the steps outlined in this guide will get you connected quickly.
Remember to check compatibility, ensure your phone is unlocked, and have a stable Wi-Fi connection before you start. By properly configuring your eSIM in the SIM card manager, you can easily manage your lines and ensure you’re using Yoho Mobile’s affordable data when you need it, especially while traveling.
Ready to experience seamless global connectivity without the hassle of physical SIM cards?